8 April 2021
Sharing our experience: How to build a website without the help of developers using Webflow
At JetStyle, we are focused on creating digital services and products. But sometimes tasks need to be completed quickly and preferably without involving developers. For instance, when testing a hypothesis for an MVP or putting together a landing page. In this case, you can use a service like Webflow, which allows the designer to do all this on their own.
Our teammates did some internal training and talked about the main things to know about this website builder.
We decided to share our knowledge with you and wrote this article. You may find this useful too)
What is Webflow?
Webflow is an advanced level builder that allows you to create corporate websites, online stores, product landing pages and other one-page sites, as well as blogs and portfolios. It has many features compared to the modest functionality of other website builders. At the same time, a designer doesn't need a developer's help to create a website. But it requires basic knowledge of HTML and CSS.

Webflow consists of three components: a no-code web design tool, CMS, and hosting. This website builder partially resembles Adobe Photoshop: there is a visual interface for layout, the elements are displayed as layers, styling is similar, but in Webflow, positions are controlled by different settings, not by the cursor. In the interface, a designer can add, position and style elements, and the system independently generates the markup and all other necessary code.
Tariff plans
The service can be used for free, but there are limitations:
-
you can create no more than two projects,
-
you cannot add custom code (CSS styles, scripts, etc.),
-
you cannot export the code.
If you want full functionality or plan to regularly use the builder, then you need to pay for an account from which you can create projects. And for a certain project to have its own domain and admin panel, you need to pay extra for hosting.
On the cheapest plan, account and hosting are $16 each per month paid annually, or $20 paid monthly. On this plan, you can create up to 100 pages on the site. In general, it covers the needs of most projects, be it a blog, portfolio, corporate website, or even an online store.
Webflow has the feature of creating a full-fledged online store — Webflow Ecommerce. The tariff plans for it differ from the basic ones.
Features and limitations

Flexible use of code
Unlike simpler site builders – Tilda, Readymag, WordPress, Wix – Webflow has many ways to use your own code, which allows you to create any necessary elements and their behaviour on the page, including integrating it into the CMS. This makes it possible for a person who is not a developer to work flexibly with the code.
Large selection of templates and animations
There are paid out-of-the-box templates on Webflow. And also a large animation block with the ability to import keys from Adobe After Effects and an intuitive interface. By using the animation block and adding custom code, you can make almost any trendy complex animation.
Adaptive element settings
By default, the builder has the following viewports: desktop, tablet, horizontal and vertical mobile versions. All settings for each element are extended from the desktop to the rest of the resolutions: if you change the width of the block on the desktop, it will change everywhere. But if you change the setting on some viewport, the desktop setting will no longer affect the setting in this viewport. And also, here, it is not always possible to see a preview of the changes: the view mode turns on and shows the working site, but in many cases, it does not show the working custom code.
Users limits
Another difference is that the account can be managed by three people who are added to the administrators. However, you cannot use one account at the same time from different devices. There is also a limit on visits – up to 100,000 per hosting.
What else you need to know
-
If your hosting is not on Webflow, and the client asks to upload the code from the builder to their site, then there will be no visual editor, just the code will remain. This work will have to involve developers, and the main advantage of the builder will be lost.
-
If you nevertheless move the site from Webflow to another hosting, you will no longer be able to use the CMS and edit the site through the admin panel.
-
The builder does not support third-party certificates, only the official one from Webflow. You can try to configure this through a proxy server, but this will require the involvement of a programmer.
Functionality
Webflow supports a large number of integrations with third party services. This allows you to add the functionality of an online store, a CRM system, SMS and email marketing tools, and other useful features to your site.

Multiple languages
There is no tool for working with multiple languages in Webflow – changing the language is done with custom code. For one of our projects, we found a ready-made solution that satisfied our needs – instant language switching without creating additional pages. If you need to make separate language pages on the site, it is better to look for information on the forums in advance.
Online store
When it comes to the functionality of an online store, Webflow has many advantages over other builders. Things that would have to be done with great effort and with the help of developers in WordPress or Wix can be set up here relatively quickly and easily.

Webflow Ecommerce has everything you need for online sales: product and inventory management, user carts, customer support, and self-checkout. You can customise every detail of your online store: storefront, shopping cart, order form, product grid and checkout pages, purchase notifications. You can also bulk export and import products in CSV format – you don't have to add them one at a time.
Creating CMS

Webflow is a constructor, you often have to do something with it. For example, there is such a thing as a collection – in fact, it is a template page. Through it, we set up all the fields that can be edited in the admin panel. Since there are too many subtleties in CMS Webflow, we will briefly describe the main ones.
How to start working with CMS?
First, we create a collection – a blank page. You can add up to 30 fields to the collection: change text, titles, upload images, galleries, etc.
After the collection is set up in the CMS, we proceed to page layout. In the Webflow interface, this is implemented almost the same way as in Figma and Photoshop – we just take and copy all the elements on the page and paste them inside the collection.
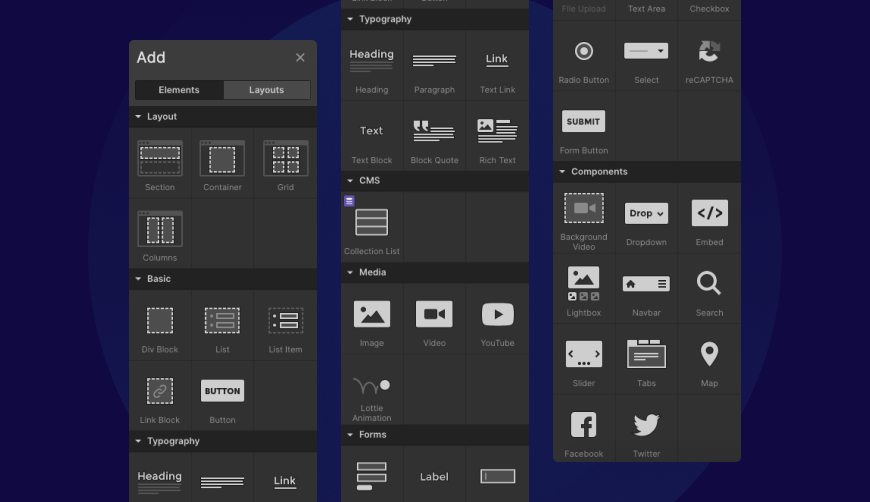
Site structure
In terms of structure, the site looks like this:
-
there is a work area, this is an editor field,
-
on the right – a field for setting a specific element,
-
on the left are:
-
Panel for adding elements (a list of everything from which the site is assembled in Webflow),
-
Symbol panel (a symbol is an analogue of a "component" in Figma),
-
Navigator (list of layers),
-
Site pages,
-
CMS panel (list of created "collections"),
-
Ecommerce panel (for working with an online store),
-
Assets – all added multimedia (pictures, videos, documents, Lottie animation files),
-
Settings (section for backups).
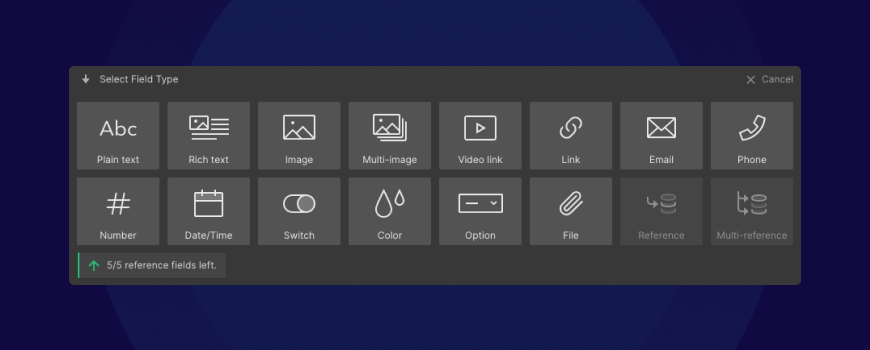
Fields in the builder's interface
In the interface, we can configure everything necessary for the content manager to work. Webflow limitation is up to 30 fields:
-
Plain text – regular text,
-
Rich text – lists, bold, italic, etc.,
-
H1-H6 headings, insertion of multimedia and captions to them,
-
Image – pictures,
-
Multi-image – gallery settings (we are not talking about a slide gallery – you need to click on a picture to enlarge it, and close to open another),
-
Video,
-
Link,
-
Email,
-
Phone,
-
Number,
-
Date / Time,
-
various switches: Swift, Colour, Option, File adding form.
Variants of using the builder
Webflow can be used to perform small operations within a designer's tasks.
Passing animation to a developer
When a designer came up with cool animation for a landing page (how this or that element moves or scrolls, what happens when a user clicks on something, etc.), and they need to explain the idea to the developer – open the builder, quickly design the animation we came up with using Webflow tools, and give the developer a link to the page with this animation. The developer will see live what they have to do in the project. You can even transfer the ready-made code to them if the account is paid and the code can be downloaded. For this purpose, of course, you can use the Principle interactive prototype editor – it renders video animations. But Webflow renders live animation in code and costs less.
Live demo to the client
There is a project, and you need to show the client the result (intermediate or final – demo). The project has several screens, states and transitions between them, or there is just animation.
For a demo that the client can understand, we can assemble an imitation of a real page in Webflow – make animations and linking between elements and screens. That is, instead of describing in words and showing approximate options, give a result that is as close to reality as possible. Of course, this means a rough assembly without working out all the details, in which:
-
static parts of the page can be inserted as pictures on the background,
-
clickable elements can also be inserted as pictures,
-
it is possible not to follow such layout rules as names of classes, elements, correct style settings because they are necessary only in a working project.
Such imitation can be done relatively quickly, and the client will receive a familiar link to the site for viewing.
For these purposes, you can use Figma, where you can also link all screens and states, but in some cases, animation cannot be done in it - to display simple states (such as hovering over a button and pressing), you need to duplicate many screens, and you can get confused in the link itself (if there are many screens).
Conclusion and recommendations
So, does it make sense for a designer to learn how to build websites in Webflow? The builder offers a lot of possibilities, so at least its tools are worth trying. Especially if there are projects where an admin panel is needed. Plus, working with Webflow will allow the designer to better understand developers.
The values of Webflow are the less, the more complex the site is needed, and the fewer skills and knowledge of layout the designer has.
For some projects, we choose Webflow because, on this builder, you can customise the design and reduce the cost of production – create a website without the help of developers and manage content from the admin panel. That is, quickly and for relatively little money to make a working project. It is convenient, for example, when a client has an MVP and needs a landing page to quickly test hypotheses.
You might also like